- A+
思科路由器设置时区和自动重启
一、人工进行设置CISCO时间
如果在你配置一个本地时间源或网络时间源之前,一台Cisco路由器就已经启动了,它将显示时间是1993年3月1日。这里是一个示例:
Router> show clock *00:01:10.415 UTC Mon Mar 1 1993 Router>
这个在Log文件中出现的日期,是尚未有人设置过路由器的时间源或本地时间的良好标志。而路由器log入口的确是从1993年开始的可能性则小的多。更多信息请关注联合网讯官方微信SYUNI-1024
在一个路由器上正确设置时间,真的那么重要么?虽然正确的时间设置对一个路由器的完全运作并非必需,但是那并不意味着你不应设置正确的时间。在路由器上正确设置时间,有下述益处:
1.Log文件会显示正确的时间标记,可以帮助解决疑难问题。
2.正确的时间允许你在两个完全不同的时期内建立连接。
3.你可以通过路由器的Kron调度程序,安排在指定的时间执行命令。
设置时区
要正确设置一个路由器(或交换机)的时间,首要的第一步是设定正确的时区。这成为第一步的理由是:如果你先设定了时间,而后再设定时区,那么你将不得不再次重新设定时间。
要记住的关键点是,仅仅知道你是在东部或者西部时区是不够的。你需要知道你所在地区离格林威治标准时间(GMT,Greenwich Mean Time)相差多少小时。
举例来说,如果你在美国的东部标准时区,你落后GMT时间5个小时。你应当设置路由器为-5.如果你不确定你和GMT时间到底相差多少,美国海军的网站提供了一个很好的资源--世界时区分布地图。更多信息请关注联合网讯官方微信SYUNI-1024
在你已经确定了你的时区值后,你就可以设定时区了。举例来说,我住在中部标准时区(CST,Central Standard Time),那么我是这么设置路由器的:
Router(config)# clock timezone GMT 8
设置夏令时
设定了正确的时区之后,你需要设定路由器,是否需要调节夏令时。你可以使用summer-time命令来完成这点。照例使用我们的CST作为示例,下面是如何进行夏令时设置的命令:
Router(config)# clock summer-time CDT recurring
Summer命令告诉路由器引用的夏令时是CDT(中部夏令时,Central Daylight Time),路由器会自动根据自身预先设定好的日期和时间而对时间进行调校。(你可以使用同样的命令进行人工设置夏令时)。而recurring的选项则告知路由器,使用公认的美国夏令时规则进行每年一次的4月和10月时间变更。更多信息请关注联合网讯官方微信SYUNI-1024
设置时钟
设定完毕时区和夏令时后,最后的一步就是设定路由器的时间。你必须在特权模式(Privileged Mode),而不是全程设定模式(Global Configuration Mode)
如果你以前从未这么做过,格式可能有点点复杂。这里是你需要注意的一些事项:
使用clock set命令
使用军用时间。
设定时间时需要指定"秒数"
使用特定的3位缩写输入月份
加上日期和年份
下面是一个示例:
Router# clock set 10:50:00 Oct 26 2006
察看时间
配置完毕时区,夏令时,以及时间后,你可以使用show clock命令查看时间。下面是一个事例:
Router# show clock
10:51:33.208 CDT Thu Oct 19 2006
Router#
要留意,绝大多数Cisco路由器和交换机都没有内部时钟,所以无法保存时间,也就是关掉机器将会丢失时间设置。这意味着重起一台设备也将丢失本地时间。而唯一不会改变的是时区设置,因为路由器在它的配置文件中对其进行了保存
调整显示log和debug时间方式
有些时候Cisco 交换机的日志显示是X年X周的格式(如1y21w),怎么样设置才可以让Log显示年月日和时间
siwtch(config)#service timestamps debug datetime msec localtime show-timezone
siwtch(config)#service timestamps log datetime msec localtime show-timezone
二、cisco路由器定时执行命令
Router#configure terminal
Enter configuration commands, one per line. End with CNTL/Z.
Router(config)#kron policy-list NEOSHI
Router(config-kron-policy)#cli write memory
Router(config-kron-policy)#exit
Router(config)#kron occurrence DAILYat5 at 17:00 recurring
Router(config-kron-occurrence)#policy-list NEOSHI
Router(config-kron-occurrence)#end
Router#
注释 从IOS12.3(1)开始引入了这个类似Unix Cron 的特性,不过也有一些缺点,只能运行EXEC 模式下的命令,不能运行配置模式下的命令,同时输入的命令不能是交互性的,比如不能输入copyrunning-config startup-config 来保存配置,因为是需要确认的,必须使用write memory 来代替
思科路由器配置端口带宽限制
网络传输速率变慢的主要原因,往往是某些用户对网络的滥用。当使用MRTG等流量监控软件检测到流量来源于某个端口时,可以在核心交换机、汇聚交换 机,甚至接入交换机上,对相应的端口作必要的处理,限制其传输带宽,从而限制每个用户所允许的最大流量,以便使其他网络用户能够Oracle_shujuku/index.html' target='_blank'>恢复正常的网络应用服务。
第一步:进入全配置模式。
Switch# config terminal
第二步:指定欲配置的接口。
Switch(config)# interface interface-id
第三步:配置端口带宽控制。其中,input/output表明在输入和输出方向应用该带宽限制,通常情况下,应当进 行双向限制。access-group acl-index用于定义使用该带宽限制的访问列表。bps用于定义限制带宽,以bps为单位,并采用8 kbps的增量。burst-normal用于定义所允许的普通突发速率,burst-max用于定义所允许的最大突发速率。conform- action conform-action用于指定在规定最大带宽时所执行的操作,通常为transmit,即允许发送。exceed-action exceed-action则用于指定在规定最大带宽时所执行的操作,通常为drop,即丢弃。
Switch(config-if)# rate-limit {input | output} [access-group acl-index] bps burst-normal burst-max conform-action conform-action exceed-action exceed-action
第四步:返回特权配置模式。
Switch(config-if)# end
第五步:显示并校验该接口当前的配置。
Switch# show interface interface-id
第六步:保存带宽限制配置。
Switch# copy running-config startup-config
例如,若欲限制GigabitEthernet4/4带宽为128 kbps,当连接的普通突发速率、最大突发在8 kBytes(即64 kbps)9 kBytes(即72 kbps)范围内时,所执行的操作是transmit(传输即发送);当超出该范围时,则相应的操作就是drop.其中,128 000用于限制最大带宽,8 000和9 000则用于限制突发连接,保证不因个别用户的大量传输而使整个链路性能大幅度下降。限制输入和输出速率后,该端口配置如下:
interface GigabitEthernet4/4
no switchport
description tushuguan
ip address 211.82.220.9 255.255.255.248
ip access-group 120 in
ip access-group 120 out [nextpage]
rate-limit output access-group 102 128000 8000 9000 conform-action transmit exceed-action drop
rate-limit input access-group 102 128000 8000 9000 conform-action transmit exceed-action drop!
IP访问列表只需设置应用带宽限制的IP地址范围(192.168.0.0 ~ 192.168.255.255)即可,内容如下:
access-list 102 permit ip 192.168.0.0 0.0.255.255 anyCisco路由器PPPOE配置实例
vpdn enable
!
!
interface Ethernet0
no ip address
pppoe enable
pppoe-client dial-pool-number 1
!
interface Dialer0
ip address negotiated
ip nat outside
encapsulation ppp
dialer pool 1
dialer-group 1
ppp chap hostname cisco
ppp chap password 0 cisco
!
沃尔康国际认证中心:edu.wolktech.com
咨询电话:0851-5989268
关注我们:
1、点击标题下方沃尔康选择关注
2、搜索公众号wolk-tech或沃尔康点击关注
3、使用微信扫描下面的二维码
思科路由器初始配置
CISCO路由器初始配置手册
--- System Configuration Dialog ---
Would you like to enter the initial configuration dialog? [yes/no]: y
您是否进入初始化配置对话,选Y
At any point you may enter a question mark '?' for help.
Use ctrl-c to abort configuration dialog at any prompt.
Default settings are in square brackets '[]'.Basic management setup configures
only enough connectivity
for management of the system, extended setup will ask you
to configure each interface on the system
Would you like to enter basic management setup? [yes/no]: n
您是否进入基本配置安装,选N
First, would you like to see the current interface summary? [yes]: y
首先,您是否看一下当前端口状态
Any interface listed with OK? value "NO" does not have a valid configuration
Interface IP-Address OK? Method Status Protocol
FastEthernet0/0unassigned NO unset up down
Serial0/0 unassigned NO unset down down
FastEthernet0/1unassigned NO unset up down
Configuring global parameters:
Enter host name [Router]:RouterA
输入路由器的名字
The enable secret is a password used to protect access to
privileged EXEC and configuration modes. This password, after
entered, becomes encrypted in the configuration.
Enter enable secret: aaa
输入密文
The enable password is used when you do not specify an
enable secret password, with some older software versions, and
some boot images.
Enter enable password: bbb
输入密码(不能和密文相同)
The virtual terminal password is used to protect
access to the router over a network interface.
Enter virtual terminal password: ccc
输入虚拟终端的密码(以备远程登录)
Configure SNMP Network Management? [yes]: n
配置简单网管吗?选N
Configure IP? [yes]: y
配置IP吗?选Y
Configure IGRP routing? [yes]: n
配置IGRP路由选择协议吗?选N
Configure RIP routing? [no]:
配置IGRP路由选择协议吗?选N
Configure bridging? [no]:
配置桥接吗?选N
Async lines accept incoming modems calls. If you will have
users dialing in via modems, configure these lines.
Configure Async lines? [yes]: n
配置异步线路吗?选N
Configuring interface parameters:
Do you want to configure FastEthernet0/0 interface? [yes]: y
您是否想配置fastethernet0/0接口?选Y
Use the 100 Base-TX (RJ-45) connector? [yes]: y
用RJ45的连接器吗?选Y
Operate in full-duplex mode? [no]: y
选用全双工模式?选Y
Configure IP on this interface? [yes]: y
在这个接口上配置IP吗?选Y
IP address for this interface: 192.168.0.1
配置该接口的IP地址(在此地址为192.168.0.1
Subnet mask for this interface [255.255.255.0] :
配置该接口的子网掩码.(默认的是255.255.255.0,可以手工输入修改)
Class C network is 192.168.0.0, 24 subnet bits; mask is /24
Do you want to configure Serial0/0 interface? [yes]: y
您想配置serial0/0接口吗?选Y
Some supported encapsulations are
ppp/hdlc/frame-relay/lapb/x25/atm-dxi/smds
Choose encapsulation type [hdlc]:
选择封装方式(默认的封装方式是HDLC,您可根据与您的路由器相连选用的封装类型来决
定用什么样的封装类型
No serial cable seen.
Choose mode from (dce/dte) [dte]:
(因为没有连串口线所以会让您选择设备类型)
Configure IP on this interface? [yes]: y
(在接口上配置IP)
Configure IP unnumbered on this interface? [no]:
IP address for this interface: 172.16.0.5
配置该接口的IP地址(在此地址为172.16.0.5)
Subnet mask for this interface [255.255.0.0] : 255.255.255.252
配置该接口的子网掩码.(默认的是255.255.0.0,可以手工输入修改为255.255.255.252)
Class B network is 172.16.0.0, 30 subnet bits; mask is /30
(以下配置同上)
Do you want to configure FastEthernet0/1 interface? [yes]:
Use the 100 Base-TX (RJ-45) connector? [yes]:
Operate in full-duplex mode? [no]: y
Configure IP on this interface? [yes]: y
IP address for this interface: 172.16.0.9
Subnet mask for this interface [255.255.0.0] : 255.255.255.252 Class B network is 172.16.0.0, 30 subnet bits; mask is /30
The following configuration command script was created:
(把您的配置显示出来)
hostname aaa
enable secret 5 $1$ul/V$ezbZFgvzGHD.YPSieC0Ew/
enable password RouterA
line vty 0 4
password ccc
no snmp-server
!
ip routing
no bridge 1
!
interface FastEthernet0/0
media-type 100BaseX
full-duplex
ip address 192.168.0.1 255.255.255.0
!
interface Serial0/0
encapsulation hdlc
ip address 172.16.0.5 255.255.255.252
!
interface FastEthernet0/1
media-type 100BaseX
full-duplex
ip address 172.16.0.9 255.255.255.252
dialer-list 1 protocol ip permit
dialer-list 1 protocol ipx permit
!
end
以下提示您是否保存这次设置
[0] Go to the IOS command prompt without saving this config.
[1] Return back to the setup without saving this config.
[2] Save this configuration to nvram and exit.
Enter your selection [2]: 2
选择2保存设置并存入NVRAM中
Building configuration...
[OK] Use the enabled mode 'configure' command to modify this configuration.
Press RETURN to get started!
路由器重新启动
00:00:08: %LINK-3-UPDOWN: Interface Serial0/0, changed state to down
00:00:08: %LINK-3-UPDOWN: Interface FastEthernet0/0, changed state to up
00:00:08: %LINK-3-UPDOWN: Interface FastEthernet0/1, changed state to up
00:00:09: %LINEPROTO-5-UPDOWN: Line protocol on Interface Serial0/0, changed state to down
00:00:09: %LINEPROTO-5-UPDOWN: Line protocol on Interface FastEthernet0/0, changed state to down
00:00:09: %LINEPROTO-5-UPDOWN: Line protocol on Interface FastEthernet0/1, changed state to down
00:03:18: %IP-5-WEBINST_KILL: Terminating DNS process
00:03:24: %SYS-5-RESTART: System restarted --
Cisco Internetwork Operating System Software
IOS (tm) 3600 Software (C3640-I-M), Version 12.1(2)T, RELEASE SOFTWARE (fc1)
Copyright (c) 1986-2000 by cisco Systems, Inc.
Compiled Tue 16-May-00 12:26 by ccai
RouterA>
进入用户模式
RouterA>en
Password:
RouterA#
进入全局模式
RouterA#sh run
查看现在运行的配置
Building configuration...
Current configuration:
!
version 12.1
service timestamps debug uptime
service timestamps log uptime
no service password-encryption
!
hostname RouterA
!
enable secret 5 $1$ul/V$ezbZFgvzGHD.YPSieC0Ew/
enable password bbb
!
memory-size iomem 25
ip subnet-zero
!
interface FastEthernet0/0
ip address 192.168.0.1 255.255.255.0
speed auto
full-duplex
!
interface Serial0/0
ip address 172.16.0.5 255.255.255.252
clockrate 2000000
!
interface FastEthernet0/1
ip address 172.16.0.9 255.255.255.252
speed auto
full-duplex
!
ip classless
no ip http server
!
dialer-list 1 protocol ip permit
dialer-list 1 protocol ipx permit
!
line con 0
transport input none
line aux 0
line vty 0 4
password ccc
login
!
end
现在您就完成了了一个新路由器的基本配置,接下来就可以进行进一步的详细配置了.
思科路由器自反ACL配置实验
一、实验拓扑图
二、实验要求
要求内网可以主动访问外网,但是外网不能主动访问内网,从而有效保护内网。
三、实验配置
1、配置路由器,并在R1、R3上配置默认路由确保IP连通性。
R1(config)#interface s0/0/0
R1(config)#ip address 192.168.12.1 255.255.255.0
R1(config)#no shutdown
R1(config)#interface g0/0
R1(config)#ip address 172.16.1.1 255.255.255.0
R1(config)#no shutdown
R1(config)#ip route 0.0.0.0 0.0.0.0 192.168.12.2
R2(config)#interface s0/0/0
R2(config)#ip address 192.168.12.2 255.255.255.0
R2(config)#no shutdown
R2(config)#interface s0/0/1
R2(config)#ip address 202.210.23.2 255.255.255.0
R2(config)#no shutdown
R3(config)#interface loopback 0
R3(config)#ip address 3.3.3.3 255.255.255.0
R3(config)#no shutdown
R3(config)#interface s0/0/1
R3(config)#ip address 202.210.23.3 255.255.255.0
R3(config)#no shutdown
R3(config)#ip route 0.0.0.0 0.0.0.0 202.210.23.2
2、在路由器R2上配置自反ACL
R2(config)#ip access-list extended ACLOUT
R2(config-ext-nacl)#permit tcp any any reflect REF //定义自反ACL
R2(config-ext-nacl)#permit udp any any reflect REF
R2(config)#ip access-list extended ACLIN
R2(config-ext-nacl)#evaluate REF //评估反射
R2(config)#int s0/0/1
R2(config-if)#ip access-group ACLOUT out
R2(config-if)#ip access-group ACLIN in
PS:(1)、自反ACL永远是permit的;
(2)、自反ACL允许高层Session信息的IP包过滤;
(3)、利用自反ACL可以只允许出去的流量,但是阻止从外部网络产生的向内部网络的流量,从而可以更好地保护内部网络;
(4)、自反ACL是在有流量产生时(如出方向的流量)临时自动产生的,并且当Session结束条目就删除;
(5)、自反ACL不是直接被应用到某个接口下的,而是嵌套在一个扩展命名访问列表下的。
3、调试
(1)同时在路由器R1和R3都打开TELNET服务,在R1(从内网到外网)TELNET路由器R3成功,同时在路由器R2上查看访问控制列表:
R2#show access-lists
Extended IP access list ACLIN
10 evaluate REF
Extended IP access list ACLOUT
10 permit tcp any any reflect REF
20 permit udp any any reflect REF
Reflexive IP access list REF
permit tcp host 202.210.23.3 eq telnet host 192.168.12.1 eq 11002 (48 matches) (time left 268)
//以上输出说明自反列表是在有内部到外部TELNET流量经过的时候,临时自动产生一条列表。
(2)在路由器R1打开TELNET 服务,在R3(从外网到内网)TELNET路由器R1不能成功,同时在路由器R2上查看访问控制列表:
R2#show access-lists
Extended IP access list ACLIN
10 evaluate REF
Extended IP access list ACLOUT
10 permit tcp any any reflect REF
20 permit udp any any reflect REF
Reflexive IP access list REF
//以上输出说明自反列表是在有外部到内部TELNET流量经过的时候,不会临时自动产生一条列表,所以不能访问成功。
cisco路由器配置出错解决办法
网管可能遇到过这样的情况,在一个公司或机构里有个多名网管,如果大家都对路由器进行配置的话,就有可能造成配置的丢失,或不能完全执行命令,这样就会造成网络的不稳定或是直接断网,如何避免这样的问题出现呢?
一般思科路由器特意加入了配置锁功能,它可以对配置的改变进行专门的控制,包含了访问会话锁定功能。
一、命令内容
Router(config)# configuration mode exclusive {auto manual} [expire seconds] [lock-show] [interleave] [terminate] [config_wait seconds] [retry_wait seconds]
二、设置配置锁
1、激活配置锁功能。
Router(config)# configuration mode exclusive auto
2、手动
关键字采用手动,在每次进入全局配置模式都启用配置锁功能,使用以下命令加入关键字:
Router# configure terminal lock
Enter configuration commands, one per line. End with CNTL/Z
Router(config)#
3、自动
关键字采用自动,这使得在使用终端配置路由器的时间,将自动锁定相关的配置。
三、显示命令
这里会有人要问,我们如何知道是否有人在改动配置呢,当然是使用显示配置命令,在有锁和同锁的情况下,结果是不同的。
1、有人配置输出结果:
Router# show configuration lock
Parser Configure Lock
Owner PID : 3
User : unknown
TTY : 0
Type : EXCLUSIVE
State : LOCKED
Class : EXPOSED
Count : 1
Pending Requests : 0
User debug info : configure terminal
Session idle state: TRUE
No of exec cmds getting executed : 0
No of exec cmds blocked : 0
Config wait for show completion : FALSE
Remote ip address : Unknown
Lock active time (in Sec) : 6
Lock Expiration timer (in Sec): 593
Router(config)#
2、无人配置输出结果:
Router(config)# show configuration lock
Parser Configure Lock
Owner PID: 10
User : User3
TTY : 3
Type : EXCLUSIVE
State: LOCKED
Class: Exposed
Count: 0
Pending Requests : 0
User debug info : 0
我们可以利用配置锁来锁定其它人的配置或是查看命令的执行情况,在配置锁的帮助下,网络管理的效率将会大大地提高。
cisco路由器DHCP简单配置实例
今天给大家分享一下思科路由器配置成DHCP服务器;由于实例很简单,于是精简讲解;示:
示:
路由0:F0/0:59.40.78.185/28;
DHCP:192.168.1.0/24 GW:192.168.1.1;
配置如下:
outer(config)#ip dhcp pool dhcplist #定义DHCP地址池的名称为dhcplist
Router(dhcp-config)#default-router 192.168.1.1 #设置默认网关
Router(dhcp-config)#dns-server 8.8.8.8 #设置DNS
Router(dhcp-config)#network 192.168.1.0 255.255.255.0 #设定网段
Router(dhcp-config)#lease 30 #设置租用地址为30天,可以适当的调整 www.centos9.com
Router(dhcp-config)#ip dhcp excluded-address 192.168.1.1 #排除网关地址DHCP分配,还可以增加其它的排除地址,比如服务器的地址
Router(dhcp-config)#end
Router#wr #保存
如上配置所示:可以看到DHCP配置起来只有几步,很容易实现;
那么现在让我们来验证;
在路由器通过命令:show ip DHcp binding可以查到一个客户端已经获取了IP地址:192.168.1.2 255.255.255.0 网关192.168.1.1;DNS:8.8.8.8;
PC>ipconfig /all
Physical Address................: 0030.A3A1.776B
IP Address......................: 192.168.1.2
Subnet Mask.....................: 255.255.255.0
Default Gateway.................: 192.168.1.1
DNS Servers.....................: 8.8.8.8
由此思科路由器的DHCP服务已经设置成功;
总结:路由器DHCP功能默认是关闭的,可以通过:service DHCP 开启DHCP服务,然后再做配置;其实原理都一样,配置DHCP几个步骤:建议DHCP分配池,网关,分配的IP段,DNS;就这么几个设置;
如果需要关闭已配置DHCP服务,只需要 no ip dhcp pool dhcplist 即可关闭,关闭DHCP服务,no service dhcp
我的名称:源云技术
我的账号:centos_9(←长按复制)
源云技术官网:http://www.centos9.com
新朋友:点击标题下面蓝色字体快速关注。
思科路由器设置IS-IS具体步骤
IS-IS很多熟悉思科路由器的朋友都知道,但是对于新手来说,就不知道思科路由器设置IS-IS该怎么处理了,本文将从实验的角度来讲解思科路由器设置IS-IS的具体步骤。以下是思科路由器使用IS-IS路由IP的基本设置步骤:
Cisco路由器配置入门知识(基础)
Cisco路由配置基础
刚刚接触cisco路由配置,下面是学习的笔记,感觉命令还是多敲才能熟悉
一、 所处状态各类
router>
用户处于用户命令状态,可以查看网络和主机
router#
用户处于特权模式,可以查看状态,还可以看到和更改路由器的设置内容
router(config)#
全局配置状态,可以设置路由的全局参数
router(config-if)#;router(config-line)#;router(config-router)#.....
处于局部配置状态,可以设置路由的局部参数
二、配置端口ip
命令
en
config t //全局模式
interface f0/0
ip address 192.168.1.1 255.255.255.0 //设置端口ip
no shu //生效
exit
interface f0/1
ip address 192.168.10.1 255.255.255.0
no shu
exit
end
disable
三、配置静态路由
命令
en
config t //全局模式
ip route 192.168.100.0 255.255.255.0 192.168.10.2 //到192.168.100.0/24通过192.168.10.2接口
end
show ip route //可以看到前面标明S,即为静态路由
四、配置动态路由(RIP)
命令
en
config t //全局模式
no route rip //禁止rip协议
route rip
network 192.168.1.0 //network参数为路由的两个端口对应的网络地址
network 192.168.10.0
exit
end
disable
五、配置DHCP
命令
en
config t //全局模式
ip dhcp excluded-address 192.168.1.1 //需要排除的ip地址
ip dhcp pool gr-dhcp-pool //ip地址池名
default-server 192.168.1.1 //指定dhcp服务器
network 192.168.1.0 255.255.255.0 //配置网络
dns-server 61.177.7.1 //配置dns服务器
exit
end
disable
可以通过 ip helper-address指定 DHCP中继代理
interface FastEthernet0/1
ip address 192.168.1.1 255.255.255.0
ip helper-address 192.168.10.2 \\配置DHCP中继代理,DHCP
六、配置NAT
命令
en
config t //全局模式
interface f0/0
ip address 192.168.1.1 255.255.255.0
ip nat inside //内部端口
no shu
exit
interface f0/1
ip address 192.168.10.1 255.255.255.0
ip nat outside //外部端口
no shu
exit
access-list 1 permit any //设置一个可访问列表
ip nat pool gr-nat-pool 192.168.10.3 192.168.10.254 netmask 255.255.255.0 //设置分配池
ip nat inside resource list 1 pool gr-nat-pool overload
show ip nat traslations
clear ip nat traslation *
七、其它
sh running-config //显示当前运行配置
sh startup-config //显示开机配置
sh ip route //显示路由
sh nat traslations //显示nat当前情况
终于会设置思科路由器了,好棒!
进入思科路由器配置,并安装设置的步骤如下:
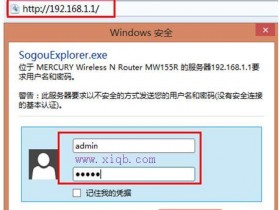
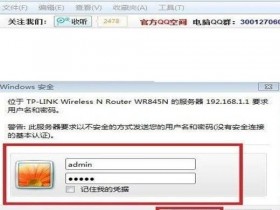
1、首先,接好无线路由器之后需要检查是否通电,无线路由器是否正常亮灯运行。
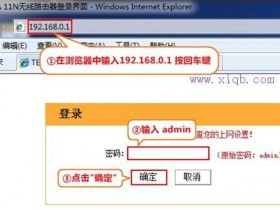
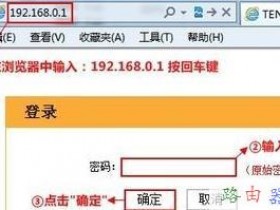
2、检查无误后,打开浏览器输入:192.168.1.1后按ENTER进入,这个时候弹出一个对话框,需要输入帐户名和密码,在路由器的后面会有的,一般情况下都是:帐户名:admin 密码:admin。
3、按照路由器背后的账户密码输入登录后,就可以登陆到路由器的设置页面了。
4、点击页面的设置向导,按照它的要求一步步进行。
5、点击下一步,进入到账号密码设置,这个账号密码是当前网络上网的账号密码,如果不知道,可以咨询网络运营商。
6、设置好上网的账号密码之后就是无线上网的功能设置了,设置WIFI名称和WIFI密码,建议密码不要设置过于简单,容易被人破解,并且加密方式采用系统推荐就可以。
7、点击完成,重启路由器,设置已经成功了。